

An Android Instrumentation Test Spike for Ayush Newatia's Rails Codex
Please feel free to skip the first couple sections and go straight to the guide
Overview
This post builds on the Hybrid Rails app presented by Ayush Newatia in his book Rails & Hotwire Codex.
In the steps below I will walk through how to set-up an Instrumented Test. which targets the elements within the TurboWebViews. Instrumented Tests are the Android term for system tests run on a physical or emulated Android device (as opposed to unit tests or other lower sections of the testing pyramid).
Being able to perform Instrumented Tests is necessary in order to follow an Outside-In development approach and is the common starting point for TDD workflows. In cases where you need to implement native functionality, the tests will start to be more similar to the types of tests written in the Rails Codex.
Tests like this will be increasingly relevant the more you plan to use Strada in your application. Strada allows you to trigger native actions on the mobile client from your Rails server and vice versa.
This is only really going to be of interest to people who bought Ayush’s book because they already have the background. From here I’ll be submitting a PR to turbo-android with the goal of presenting a case that could be applied more broadly.
I’m in a bit of a writing/rambling mood. This feels like it might be a good occasion to make contact with some new Ruby folk. So I wrote a bit about my background and our app in the sections below.
Please feel free to skip the next couple sections and go straight to the guide
Why did I do this?
I can code, but I’m certainly no pro. To be honest, I’m all over the place. So I rely on my tests to help me get back up to speed if I had to put aside my app for a few months to work on electronics, biz dev, whatever it is.
Ayush really did a great job with this book. But when I finished, I didn’t know how to target the native elements or test elements within the WebView. So I threw some hours at it.
Some may feel that testing these elements isn’t necessary if you are only using it as a native ‘window’ to your web-app. Maybe that would be sufficient for a lot of Progressive Web Apps (or PWAs) out there.
In my case, the part of the book that was very compelling was the web-bridge which allowed for passing messages between web-server and native client which would trigger actions within the native client. The native features that are especially important for our case are Push Notifications and GPS. This web-bridge is exactly what the recently released library Strada is intended to achieve.
Through some combination of fate and circumstances, I’ve yet to bring a developer into my codebase who was inclined towards writing tests. For me though, writing untested code makes me feel naked and exposed.
I’ve done some amount of ropeless rock climbing, I’ve had close calls where I intentionally entered a situation where I was holding my life in my hands. I’ve also found myself in that position totally by surprise due to equipment (or some environmental circumstance) not performing the way it was expected to. In some ways, I could say (both metaphorically & literally) that my life since arriving in the Philippines has been like that.
It can be exciting. It can be liberating. It certainly produces memorable experience.
But in reality, I climbed the most difficult pitches of rock when secured by the safety equipment that others had installed for the benefit of climbers who’d come later.
Proper safety equipment is also what allows a climber to push their physical limits. I’d suggest that the same is true of a software system with good test coverage.
I’d like to believe that what we are building at sunE is going to last. So getting this test spike in place is, for me, a necessary step in preparing to take our hybrid-rails app into production.
Once again, please feel free to skip this section and go straight to the guide
Some backstory on our app
To start, I’ll say that we didn’t start sunE in order to write software. But we didn’t start it in order to do any of the many other technical or other things we need to do on a daily basis either. We came to build a climate solution for the 21st centrury that would beat the staus quo that evolved over the 20th century in most meaningful metrics.
The need for a performant app stemmed from how important it was to have our operations run smoothly and how the general purpose tools we tried tended to miss the mark regarding the visibiity we needed.
Like many choices in my life, I got into Rails for reasons I don’t have a very good explanation for. But it was the emphasis on TDD that has kept me here.
I pretty much learned Ruby via RSpec in the Pragmatic Programmer RSpec book. While not strictly a TDD book, it taught me the TDD ropes and was the launching point into several episodes where I spent obscene hours trying to figure out how to set a test harness in new languages, onto MCUs, or getting my CI/CD into a single button test, build & depoloy via docker.
For us little guys with insane plans and no resources to throw at pro developers (yet?), it’s a huge comfort knowing that my tests have my back when I revisit a codebase I haven’t touched in years, or revive features that I’d developed for past use-cases that faded away but are now being requested again.
We first boarded Rails (via localhost) into our operations in 2017 for tracking the batteries as they were swapped in and out of our trikes. The developer started with enthusiasm but eventually ghosted. So I re-wrote everything he did via TDD with RSpec.
Then, in 2018, we made our first attempt at a native app allowing drivers to keep track of ridership via React Native. Without getting too deep into it, the toolchain added a lot of overhead & complexity that we weren’t ready for.
Eventually, during the pandemic lockdown, I had the time to try & develop a feature myself:
- Allowing passengers to request a ride from their doorstep. Rather than the fixed routes we’d been running in the years prior.
Trying to promote this at the time made me accutely aware how accustomed everyday people (in the Philippines) are to apps. Many people I’ve spoken to don’t really know what a browser or a website it. I kind of feel it’s tragic how unaware many are of an online world outside of the App Stores, Facebook, YouTube, etc. But it’s the world we live in.
Beyond that, there are two native features that are pretty crucial to our case: Push Notifications and GPS.
Long story short, it became clear to me that if I really wanted to build an app, it’d need to be native. I tried React a handful of times but it just didn’t do it for me.
As I mentioned above, it often happens that I have to totally shift gears towards electronics, microcontrollers, batteries, business development, marketing or whatever else.
So when I saw Ayush’s cover with the One Man Band fellow on the cover, I could tell he understood the struggle and why Rails (& the goal behind Turbo, Strada, etc) is still relevant.
I finished the book mid-last year and adopted the native skeleton into my app. Since I knew that Strada was going to be released, I held off on the native features for the moment, looking forward to the updated book.
When Strada did launch back in November though, I started to get itchy. So I scraped together my first implementation and shipped my first feature leveraging the JS-bridge.
During 2023, I’d tried unsuccessfully to test the native code and set it aside defeated. But I’m proud to say that I finally got it.
So ya, that’s my Rails & TDD story. I still have a long way to go to mature as a programmer, but Rails Codex book has moved me forward big time and I think that this PWA approach gives a viable path to many other small businesses out there as well.
Right, rant over, here’s how to test your TurboWebViews.
Testing elements from within a TurboWebView
- I’m assuming your app is already successfully fetching from the local app. In my case, I finished the book on a previous computer, so as a recap, I needed to:
- re-download the finished code (android & web)
- set-up the database
- set-up redis (or remove it from the set-up scripts)
- add the bind argument of the ip address to Procfile.dev
- add the IP address to
Api.kt&network_security_config.xml
At that point, you should be able to load the app from your android device.

Stock test
- Instrumented tests are contained within the
androidTestthe book code (which was created from AndroidStudio boilerplate automatically when the new project was created.
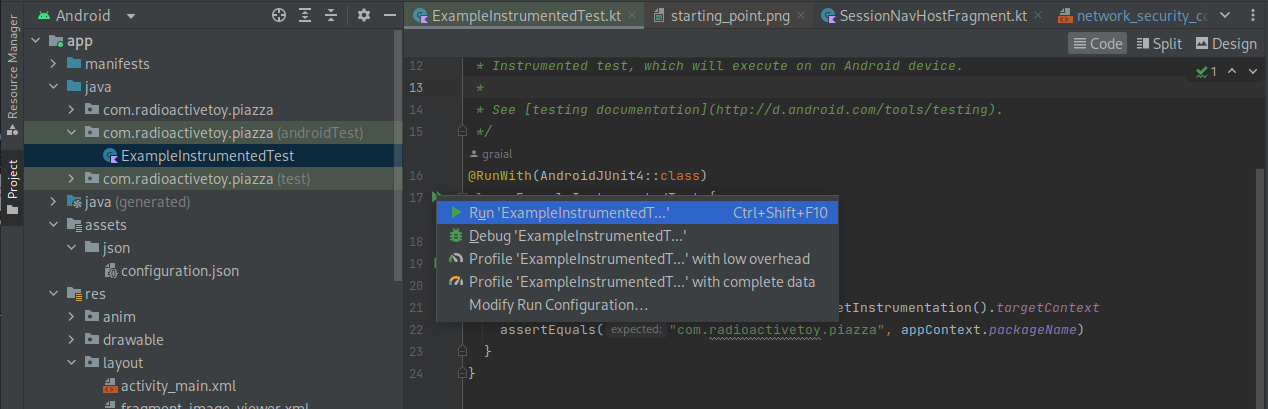
It has a single file called ExampleInstrumentedTest which has a single sample test called useAppContext
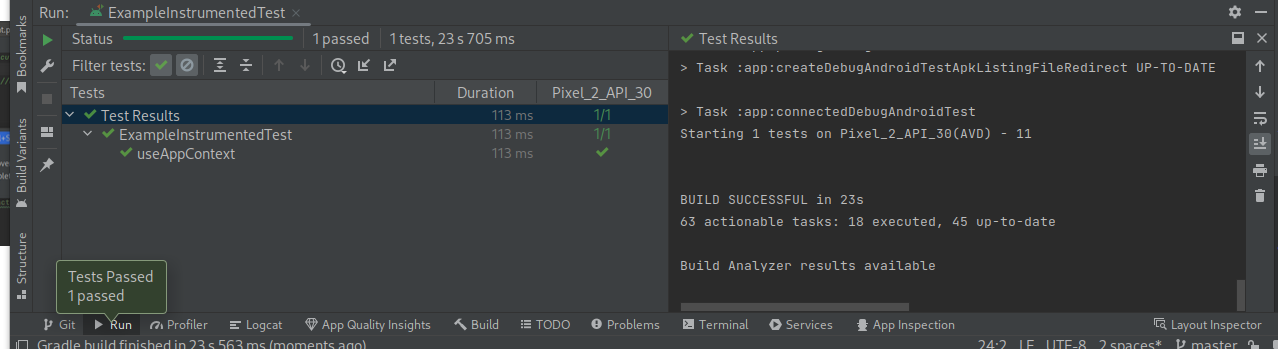
If you click on the double green arrow left of the class declaration, you will see an option to run all of the tests within the class (right now there’s only one).
Click and you will notice some activity on the screen of the connected device, followed by a green checkmark in the windows below, indicating that the test passed.
First test
Now we can proceed to writing a test of our own. Let’s get the main screen to appear and check for the test in the title bar with this test:
  @Test
  fun displayScreenTitle() {
    onView(withId(R.id.tabSwitcher))
    Thread.sleep(2000)
    assertDisplayed(R.string.tab_home)
  }
assertDisplayed comes from the Barista library which can be imported with
androidTestImplementation("com.adevinta.android:barista:4.2.0")This lands us on our first test failure:
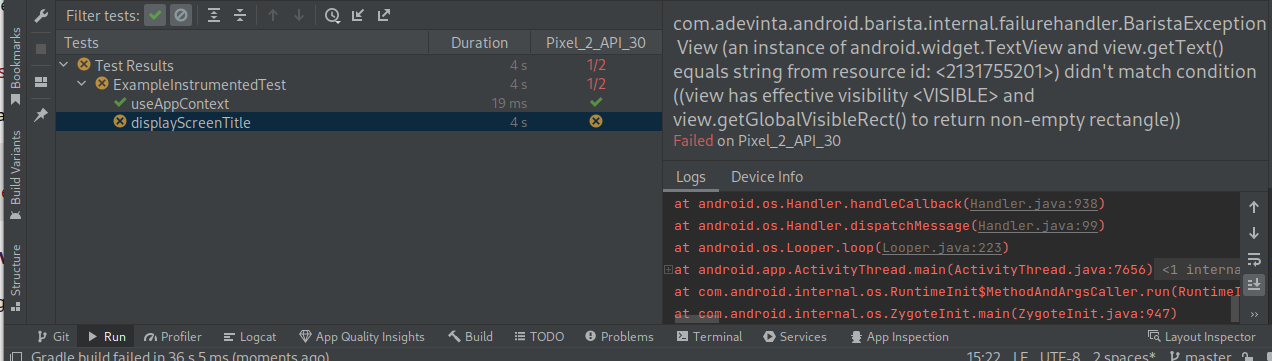
Barista couldn’t find the test we were seeking. If you watched the test device while the test ran, you might notice that the home screen didn’t actually load.
We need to launch the MainActivity first. The instructions for handling activities within Espresso can be found here.
For our case, we will define a rule which launches MainActivity:
@RunWith(AndroidJUnit4::class)
class ExampleInstrumentedTest {
  @get:Rule
  val activityScenarioRule = activityScenarioRule<MainActivity>()
    .
    .
    .
  }
Which requires adding this library to build.gradle
androidTestImplementation("androidx.test.ext:junit-ktx:1.1.5")This should now pass. If it fails to find the title, you can try increasing the delay in Thread.sleep(2000).
Obviously using delays is an inefficient way to test. The proper way to handle loading events is with Idling Resources. There are a couple different ways to implement these and I’m not yet sure which way I want to go for my app, so for the moment, I’m putting up with the delays as I get more comfortable with the tooling.
Targeting elements within the webview
Now that we can pull up the activity, we can proceed to the third test which will go after the elements within the WebView:
Let’s review the structure of activity_main.xml (with irrelevant attributes removed)
<androidx.constraintlayout.widget.ConstraintLayout>

  <com.google.android.material.bottomnavigation.BottomNavigationView
    android:id="@+id/tabBar"
    />

  <ViewFlipper
    android:id="@+id/tabSwitcher"
    >
    <androidx.fragment.app.FragmentContainerView
      android:id="@+id/tab_home"
      />
      .
      .
      .
      3 more tabs in FragmentContainerView
      .
      .
      .
    <androidx.fragment.app.FragmentContainerView
      android:id="@+id/tab_profile"
      />
  </ViewFlipper>
</androidx.constraintlayout.widget.ConstraintLayout>
The elements we need to target are inside of the FragmentContainerViews, which are inside the ViewFlipper, let’s get the ViewFlipper first by creating this new test (which should pass):
 @Test
  fun displayMainTurboView() {
    onView(withId(R.id.app_bar))
    Thread.sleep(2000)
    onView(withId(R.id.tabSwitcher))
  }
For whatever reason, apparently the Android community still doesn’t have a streamlined library for matching ambiguous views. Stack overflow questions asking about this challenge will often receive a bunch of suggested CustomMatchers to try.
To isolate the first view container, I was able to use this function. Apparently it was originally provided by the Android team, but I don’t know the location of the original.
    fun nthChildOf(parentMatcher: Matcher<View>, childPosition: Int): Matcher<View> {
        return object : TypeSafeMatcher<View>() {
            override fun describeTo(description: Description) {
                description.appendText("position $childPosition of parent ")
                parentMatcher.describeTo(description)
            }

            public override fun matchesSafely(view: View): Boolean {
                if (view.parent !is ViewGroup) return false
                val parent = view.parent as ViewGroup

                return (parentMatcher.matches(parent)
                        && parent.childCount > childPosition
                        && parent.getChildAt(childPosition) == view)
            }
        }
    }
You shouldn’t need to add any new libraries. But for the imports, where there is an option, choose the option provided by hamcrest.
As the name suggests, nthChildOf allows you to choose from a set of matches by its position within the sequence
We are able to target the Home container by adjusting the test as follows (this should also pass):
    @Test
    fun displayMainTurboView() {
        onView(withId(R.id.app_bar))
        Thread.sleep(2000)
        onView(
            nthChildOf(
                withId(R.id.tabSwitcher),
                0
            )
        ).check(matches(withId(R.id.tab_home)))
    }
Adding Espresso Web to get inside the TurboWebView
To get at the contents of the TurboWebView, we can use espresso-web
here’s the package to add to build.gradle
androidTestImplementation 'androidx.test.espresso:espresso-web:3.5.1'This is what the final test will look like when with the webView matcher added:
  @Test
  fun displayMainTurboView() {
    onView(withId(R.id.app_bar))
    Thread.sleep(2000)
    onView(
      nthChildOf(
        withId(R.id.tabSwitcher),
        0
      )
    ).check(matches(withId(R.id.tab_home)))

    onWebView()
      .withElement(findElement(Locator.ID, "search-button"))
  }
Note: Locator.ID refers to an id element in the html element which wasn’t included in the original book. In TDD I’d maybe feel like I was getting ahead of myself. But the test won’t compile without a valid Locator
Using the following new imports:
import androidx.test.espresso.web.sugar.Web.onWebView
import androidx.test.espresso.matcher.ViewMatchers.withContentDescription
import androidx.test.espresso.web.webdriver.DriverAtoms.findElement
import androidx.test.espresso.web.webdriver.Locator
The test fails with the following:
androidx.test.espresso.AmbiguousViewMatcherException: 'an instance of android.webkit.WebView and webView.getSettings().getJavaScriptEnabled() is <true>' matches 5 views in the hierarchy:
- [1] TurboWebView{id=-1, visibility=VISIBLE, width=1080, height=1437, has-focus=false, has-focusable=true, has-window-focus=true, is-clickable=true, is-enabled=true, is-focused=false, is-focusable=true, is-layout-requested=false, is-selected=false, layout-params=android.widget.FrameLayout$LayoutParams@YYYYYY, tag=null, root-is-layout-requested=false, has-input-connection=false, x=0.0, y=0.0, child-count=0}
- [2] TurboWebView{id=-1, visibility=VISIBLE, width=0, height=0 ... rest is the same as TurboWebView#1}
- [3] TurboWebView{id=-1, visibility=VISIBLE, width=0, height=0 ... rest is the same as TurboWebView#1}
- [4] TurboWebView{id=-1, visibility=VISIBLE, width=0, height=0 ... rest is the same as TurboWebView#1}
- [5] TurboWebView{id=-1, visibility=VISIBLE, width=0, height=0 ... rest is the same as TurboWebView#1}
Which tells us that there is one TurboWebView for each tab. While Ayush didn’t target elements with id in his system tests, that is what I usually find the easiest. In Android, the contentDescription seems to provide a similar testing convenience. We can target by contentDescription like this:
  @Test
  fun displayMainTurboView() {
		.
		.
		.
    onWebView(withContentDescription("web_view_home"))
      .withElement(findElement(Locator.ID, "search-button"))
  }
Which now fails with no matches:
androidx.test.espresso.NoMatchingViewException: No views in hierarchy found matching: view.getContentDescription() is "web_view_home"If you review the view hierarchy in the AmbiguousViewMatcherError above, you’ll notice that we haven’t actually added a contentDescription yet. This is the only production code change required on the Android side. We make it in SessionNavHostFragment.kt.
since we are already setting the tag in onCreate with sessionName = "tab_$tag", we can use that tag to set our contentDescription with a new override on onCreateWebView
  override fun onCreateWebView(context: Context): TurboWebView {
    return super.onCreateWebView(context).also {
      it.contentDescription = "web_view_$tag"
    }
  }
Now the test fails with:
java.lang.RuntimeException: java.lang.RuntimeException: Atom evaluation returned null!The atoms are the HTML elements within the TurboWebView. So we are now inside our target, but as I mentioned above, the book code didn’t supply ids on any of the HTML element.
Let’s now jump into the piazza-web code and add an id to the submit button of the search bar:
piazza-web/app/views/feed/_search.html.erb
  <layout-group class="buttons is-right">
    <%= f.submit t(".search"),
          name: "",
          class: "button is-primary",
          id: "search-button" %>
  </layout-group>
and BOOM! we’ve hit it!

Hopefully that helps some folk find their way around testing elements within their Hybrid Turbo Apps. These are much slower to run and are a more complex CI/CD integration than regular Rails system tests. So use them sparingly. But they should help with catching regressions and expected behaviour when you start moving native elements around with Strada.
Tuloy-tuloy na!
Al